XNA Templates for Visual Studio 2013

Before XNA was put out to pasture, a number of developers published additional Visual Studio project and item templates for it. During my quick search on the Visual Studio Gallery, there’s a couple dozen templates excluding the ones for Cocos2D-XNA. I can’t say anything for most of the templates, but I have found the XNA Content Pipeline Debugging template to be valuable. I ignored this template for a long time but it is a step over littering your pipeline extensions with Debugger.Launch() in a desperate attempt to debug them. Check out the author’s blog post about this template.

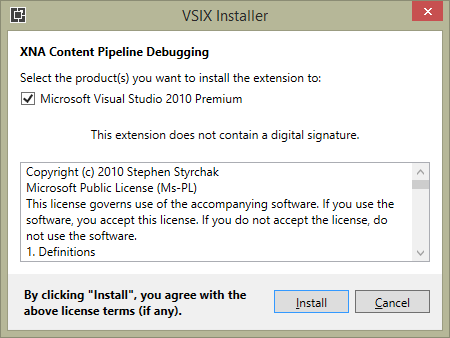
The problem with the content pipeline debugging template is it was published in 2010, along with most of the other XNA templates. The installers for the templates only recognize the version of Visual Studio that XNA Game Studio was designed for: 2010. If you’ve already migrated your game development to Visual Studio 2013, you’re not going to find the templates you’ve installed.

vsix_installer_2010

The templates distributed on the Visual Studio Gallery are packed as VSIX packages, so they are technically full blown Visual Studio extensions. VSIX packages are really just ZIP archives hiding behind a different extension, so we can rename them and walk right in. This means we have an opportunity to cheat!

Inside the VSIX archive will be a file extension.vsixmanifest. This file includes the extension name, author, description, and such. It also specifies what versions of Visual Studio it can be installed with. DebugPipeline.vsix comes with this block:

<SupportedProducts>
  <VisualStudio Version="10.0">
    <Edition>Ultimate</Edition>
    <Edition>Premium</Edition>
    <Edition>Pro</Edition>
    <Edition>VCSExpress</Edition>
    <Edition>VPDExpress</Edition>
  </VisualStudio>
</SupportedProducts>

The version is 10.0, which corresponds with Visual Studio 2010. Let’s duplicate it to support 2013 as well.

<SupportedProducts>
  <VisualStudio Version="10.0">
    <Edition>Ultimate</Edition>
    <Edition>Premium</Edition>
    <Edition>Pro</Edition>
    <Edition>VCSExpress</Edition>
    <Edition>VPDExpress</Edition>
  </VisualStudio>
  <VisualStudio Version="12.0">
    <Edition>Ultimate</Edition>
    <Edition>Premium</Edition>
    <Edition>Pro</Edition>
    <Edition>VCSExpress</Edition>
    <Edition>VPDExpress</Edition>
  </VisualStudio>
</SupportedProducts>

Visual studio 2013 is product version 12.0. If you wanted to also support 2012, you would add another block with version 11.0.

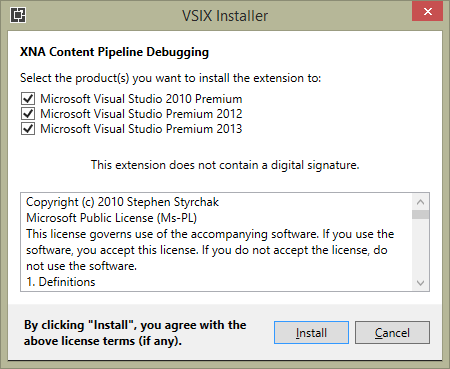
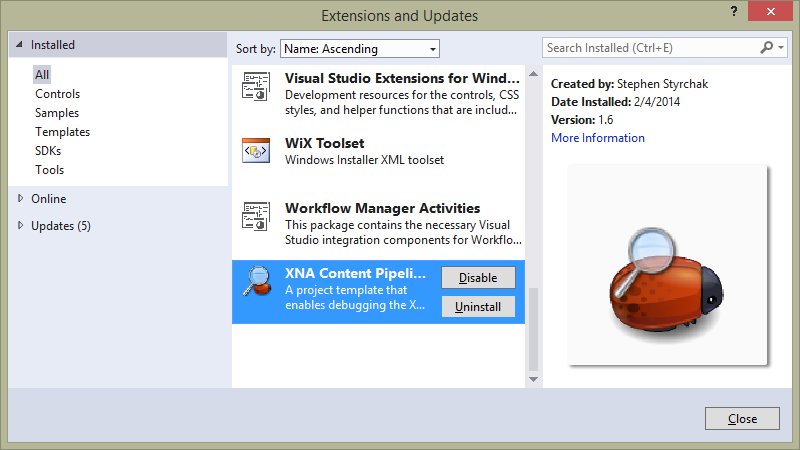
Save your changes, insert the file back into the zip archive, and rename it to have a VSIX extension again. Running the VSIX should result in the installer giving you more choices for where to put it and ultimately drop it into 2013 for you.

vsix_installer_2013

vsix_pipelinedebug

By forcing the VSIX to target newer versions of Visual Studio, we would ensure that if the template carried any extra baggage, that would be brought along. This assumes that everything in the VSIX will be compatible or correctly configured for later versions of Visual Studio, but that is not guaranteed. It’s not a problem for the content pipeline debugging template. Review my previous entry on MonoGame and Visual Studio 2013 integration for potential caveats with templates in newer versions of the IDE and how you might fix them.

Now, since this was all about a template with no other dependencies, we could have dug further into the VSIX archive and pulled the template zip file out directly. For DebugPipeline.vsix, the template is located at T/CSharp/Xna Game Studio 4.0/DebugPipeline.zip. You could drop this into your user project templates folder for 2013 located in Documents, and it would also appear as a project item, without a corresponding entry in your extension manager. This is a viable alternative in case the above method fails. A signed VSIX could be a potential reason for that.

Happy template installing and content pipeline debugging.

Posted in Tutorials | Tagged , , , , , | 4 Comments

When in Doubt, Build From Source

I’m not a core MonoGame developer, but I try to answer the occasional question on the project’s CodePlex, StackOverflow, GitHub, this blog, etc. For a lot of these questions, I answer back with another question: Did you try building MonoGame from the latest source? Often the answer is “no”, followed by “yeah, that fixed it” or “well I got a little further this time”.

Compared to most software [citation needed], MonoGame is particularly egregious in its disparity between packaged releases and the central repository. Its last official release is still 3.0.1, around 10 months old. This release is not only missing out on 10 months of platform and API improvements, but it has some well-known flaws as well. Like the missing GamePad class. Oops. There’s newer unofficial nightlies that get packaged on the project’s build server, but these have had some packaging flaws of their own. Recently for example (and it might still be a problem), there’s been a mix-up with the WindowsGL and DirectX Windows assemblies. It’s easy to build MonoGame from source though, and it really only requires two steps:

  • Check out a copy of the full MonoGame repository, which will also brings down its dependencies.
  • Open the *.sln file for the platform you want in Visual Studio (or Xamarin Studio), and “build”.

Reference your newly built assembly from your project, or better still, reference the MonoGame *.csproj for your platform directly. If you encounter a failure in the framework, you’ll get the benefit of breaking inside MonoGame and you may get a better stack trace to share with other developers if you need help.

I’m not suggesting you should swear off official releases, but building from source should be one of your standard troubleshooting steps. Do swear off the 3.0.1 release though.

Posted in Programming | Tagged , , | 4 Comments

Migrating MonoGame Projects to VS2013 and Windows 8.1

Support for XNA ended with Windows 7 and Visual Studio 2010. Since a lot of MonoGame projects still depend on the XNA content projects to drive the content pipeline, a functional XNA Game Studio environment is still needed. This makes migrating to later versions of Windows or Visual Studio a pain. Here’s my notes on the process. Nothing I’m presenting here is new information; I’m simply collecting it into a single place for convenience.

You’ll need to migrate to Windows 8 or later to take advantage of Windows Phone 8 development. Likewise you’ll need to adopt Visual Studio 2012 or later to integrate with the Windows Phone SDK.

Continue reading

Posted in Tutorials | Tagged , , , , | 7 Comments

MonoGame “Hello World” on Mac OS X and Xamarin Studio

After seeing back-to-back issues on Stack Overflow, it’s come to my attention that just getting MonoGame’s equivalent to Hello World running in Xamarin Studio on OS X is … rough. There are multiple pain points that will get in your way, so today’s post is a guide to hopefully get you past that first stumbling block. This information is accurate as of September 2013. In the future, these pain points will hopefully go away, so please leave a comment if this information has become obsolete.

Continue reading

Posted in Tutorials | Tagged , | 20 Comments

LilyPath

Along with a couple game projects, I have various pieces of tooling and libraries that I’m working on. Today I’m sharing LilyPath, a drawing library for MonoGame and XNA.

lilypath

LilyPath provides some of the functionality found in System.Drawing, such as drawing paths and shapes with configurable pens and brushes. Instead of creating raster image however, LilyPath renders everything directly to your scene. Complex paths and filled shapes are rendered as polygons, while primitives are rendered as GL or DX lines.

Drawing is handled through a DrawBatch object to reduce the number of draw calls needed, mirroring the role of SpriteBatch for rendering textured quads. More complex geometry can be compiled ahead of time into GraphicsPath objects, which contain the polygon data after arcs, joins, and other calculations have been completed.

Here’s a short code sample for drawing the lily pad in the picture above (without the flower):

drawBatch.Begin(DrawSortMode.Deferred);

Vector2 origin = new Vector2(200, 200);
float startAngle = (float)(Math.PI / 16) * 25; // 11:20
float arcLength = (float)(Math.PI / 16) * 30;

drawBatch.FillCircle(new SolidColorBrush(Color.SkyBlue), origin, 175);
drawBatch.FillArc(new SolidColorBrush(Color.LimeGreen), origin, 150, 
    startAngle, arcLength, ArcType.Sector);
drawBatch.DrawClosedArc(new Pen(Color.Green, 15), origin, 150, 
    startAngle, arcLength, ArcType.Sector);

drawBatch.End();

Source code for the full image and other examples can be found in the included test project, LilyPathDemo.

I’m currently using LilyPath in a game project for procedural terrain generation, and in a level editor for general annotation support. If you find an interesting use for this library, let me know in the comments.

Posted in Programming, Software | Tagged , , , | 9 Comments

Floppy Music

Floppy music has been floating around the Internet for a few years now with some real classic demonstrations like Phantom of the Floppera and The Ghostbuster’s Theme on 8 Floppy Drives. “Many Thousands” is probably an understatement of the number of floppy music videos that have been put up on YouTube by now.

Despite the novelty being old hat, it’s hard not to appreciate seeing it work in person. Since the company I work for encourages employees to give short presentations on practically any topic at the end of our bi-weekly staff meetings, I thought this would be a fun, easy, and short demonstration to put together. Here’s a recording of one of the songs I demoed:

One of the benefits of the floppy music phenomenon already being done to death is that other people have already done all the hard work for you. I used (loosely) this Instructables piece as a guide, which outlines everything you’ll need and how to put everything together. Here’s a few notes on my experience:

  • Don’t forget to install your Arduino drivers if you’re a complete Arduino newbie like me. If you see an error in the Arduino software that looks like avrdude: stk500_getsync(): not in sync: resp=0x00, then you’ve selected the wrong device port and likely forgot to install those drivers.
  • Counting pins on a 34-pin floppy connector is hard. If your drives aren’t responding and you’ve double-checked you have the right pins connected, check again.
  • If you have old PC jumpers kicking around, they’re great for bridging the drive select pin to the ground pin below it.
  • Front panel wires make great solder-free floppy connectors if you have an old PC case to harvest some from. Old CD drive analog audio cables also work great, requiring 2 per drive (or cut one in half).
    • I used these male to female jumper wires, which can be peeled apart into groups of 4 and plug into the drives and Arduino headers without any fuss.
  • Standalone molex power adapters are very convenient alternatives to using a full ATX power supply. I had a couple that came with USB SATA/IDE bridges for connecting raw external disks to a system. You’ll probably need a few of these as well.
  • VGMusic is a great source for video game MIDI files, but almost none of them will be suitable for playing on floppy drives. Have a MIDI sequencer on hand and be prepared to combine, cut out, transpose, and modify tracks to make them playable and actually decent sounding. I don’t have any recommendations for a free sequencer. If you have a recommendation, leave a comment.
Posted in Uncategorized | Tagged , , , | 5 Comments

MonoGame WinForms Repository

This is a quick note that I’ve setup a repository on GitHub specifically for code and examples related to MonoGame WinForms controls. You can find it here:

https://github.com/jaquadro/MonoGame-WinFormsControls

mgtkWinformsDemo4

The repository unifies all of the code that I’ve put up as separate downloadable projects in each post. The code is also improved in some places, and includes better example projects. Since I’ve caught myself re-implementing the basic control code several times now in projects, I’ve setup the main control project as a standalone library that you can include and extend. You can still use the code as a template to directly copy into your projects if that fits better.

So far I’ve written three entries on this topic. Two of them have been prompted by your questions and feedback. The WinForms controls repository will be updated accordingly I write new entries, although it may continue to see minor changes regardless.

mgtkWinformsDemo3

Looking forward, MonoGame is still undergoing plenty of turmoil. There’s several different proposals on the table that could invalidate some or all of the code I’ve put up so far. Two particular items that have caught my eye:

  • There’s an open pull request on multi-GameWindow support for DirectX. It looks like this will be included, and then will be applied to OpenGL. This could result in DirectX-controls becoming viable. It could result in a better way of managing OpenGL controls down the road. It may also remove the need to implement our own version of the Game class. That would be very welcome, but I don’t have any answers yet.

  • There’s open debate on whether SDL2 could replace OpenTK as an underlying game/rendering platform. This would likely invalidate everything that has been put up so far, since we currently depend on OpenTK’s GLControl and what it exposes in terms of OpenGL context and APIs. It’s unclear if there will be an SDL2 equivalent that works without hacking into MonoGame and/or SDL2.

These are issues I’m keeping an eye on. If you have more information on these topics, feel free to share in the comments.

Posted in Tutorials | Tagged , | 13 Comments

MonoGame + WinForms: Where’s My Keyboard?

A reader of an earlier post in the MonoGame + WinForms series pointed out a problem I never thought to test for: using MonoGame’s keyboard input with your embedded MonoGame control doesn’t work. Today’s post will solve this.

First, why doesn’t the keyboard just work? Not too surprisingly, MonoGame’s keyboard input is handled by the underlying OpenTK game window, which is bound up behind the Game object. We don’t have a practical way to use the Game object, even when we want to embed our actual game. So just as I suggested replacing the Game object with another implementation, we can replace the keyboard services with a simple implementation that’s compatible with WinForms.

To use MonoGame’s keyboard input, we would call a static method within the Keyboard class, giving us back a KeyboardState to work with. We won’t be able to use the Keyboard class directly, but we can create a parallel version of it that still gives us back KeyboardStates. That’s the easy part. Most of the pain points come from WinForms itself.

Continue reading

Posted in Tutorials | Tagged , , , , | 1 Comment

A Cautionary Tale in Code Formatting

Everyone has their code formatting pet peeves. Whether your favorite argument is tabs-vs-spaces, indentation and brace rules, camelCase-vs-PascalCase, you probably have some anecdotal situation that you staked your position on. Now I’m going to throw in my opinion on a particular formatting practice that I’ve never liked much:

A conditional control structure and its body sharing the same line of code.

Please, don’t do this.

Especially if you’re writing in a language that allows nesting scoped blocks.

Especially, especially if that language you’re writing in is C.

Especially, especially, especially if you’re porting code you don’t understand well into C.

What makes that last line so special that it deserves all those ‘especially’s? Basically, you can end up with code like this:

if (someVariableA == doSomeCheckOn(someVariableB) && !someConditionC) blah = 0;
{
    int x1, x2, x3, x4;
    int y1, y2, y3, y4;
    // A bunch of work
}

Most programmers scanning down a long block of code that see this will keep their focus to the left, and automatically assume that the big block of work they see will only be executed when the conditional is true. The reality is exactly the opposite.

All that’s required for this incongruity to occur is a language that lets you write a statement on the same line as a conditional and create independent nested scoped blocks. But almost no one would ever write code like that. How often do you even write a nested scoped block without some control structure attached to the front of it?

That’s where C comes in when you’re restricted to pure C90, and the inability to declare your variables as you need them. For methods that grow very long with lots of variables needing to be declared all over the place, it can be tempting to create arbitrary inner scopes. It helps compartmentalize all of that data and complexity. But I think you’re still not likely to encounter this situation when writing virgin code. You’re more aware of what’s going on.

And that’s where porting other higher-level code to C comes in. Porting is a very mechanical and tedious process, and it’s easy to lose awareness of what you’re doing. Especially if you didn’t write the code in the first place, or don’t understand what the code is supposed to do. You’re just translating syntax. If you end up porting a bunch of one-line conditional-and-statements, and then go back over to try and shore up your variable declarations with extra inner scopes, you may create that above example and have no idea. Woe be the developer that needs to work with this code later.

This is something I personally experienced while porting a large amount of C# code that I didn’t understand into C. To help set up the perfect storm, the C# code was written with Allman-style braces, except for single-statements which were mostly compressed into a single line. The syntax was ported faithfully and in some cases extra scopes were injected to prevent relocating large numbers of variable declarations. It wasn’t until I wasted a bunch of time trying to figure out why a break point wasn’t being hit that I noticed the deceptive syntax.

The only good news is that your code is still correct, unlike a certain JavaScript brace style issue. But it can certainly ruin a few hours of your day if you need to debug and your assumptions of control flow are incorrect.

Posted in Programming | Tagged , , , | 3 Comments

Embedding Your MonoGame Game in a WinForms Control

This post is a follow-on to my previous entry: Bringing your XNA WinForms Controls to MonoGame + OpenGL.

In my previous entry, one reader brought up a good question: once you have your MonoGame-based WinForms control working, how do you run your game in it? This is a problem I had to solve in XNA during early development of my editor when I wanted to run my live game in it. For reasons that will follow, my solution involves replacing MonoGame/XNA’s Game class entirely for the embedded version, and making sure my game is designed to not depend on having a Game object present.

The WinForms series project with an embedded game.

The WinForms series project with an embedded game.

Continue reading

Posted in Tutorials | Tagged , , , | 40 Comments